Core Concepts
In the following chapters, some terms will appear repeatedly. Some of them may not be easy to understand, so we list some core concepts here, hoping to help you.
INFO
You can start to manage your data for free in web app.
You can also start with mobile app and scan your barcode with mobile app for free, even try it without signup.
Template
Let's say you are managing inventory data, it will probably contain product names, UPC, SKU, unit price, quantity, supplier, purchase time, etc. If you are using Excel to manage it, then the first row of your Excel spreadsheet will be these titles.
If you create a new Excel file, you may need to copy these titles over to the first row in the new file.
If you need to adjust the order of these titles, for example, you want the quantity to appear before the unit price. Or you also want to manage other data, such as equipment. It may be composed of name, type, purchase time, purchase price, etc., which is somewhat different from inventory management. Then you need to maintain different titles in Excel. As more and more Excel files are created, it becomes more and more troublesome to manage them.
In DatamineHub, the concept of Template is used to help solve this pain point. Before entering your data, you first define a Template, such as Inventory Management Template, Equipment management Template, etc. Each template is used to manage a type of data with the same attributes. After that, you just need to create your data files based on your templates. For the same template, all the data files follow the same data attributes defined in template. Such as all inventory files have Name, UPC, SKU etc. Change those titles in the template and re-order will reflect in all inventory files automatically.
Template is available on both DatamineHub mobile and web app, below is an web app example to give you a more intuitive understanding of template.
[Double click the image to enlarge] 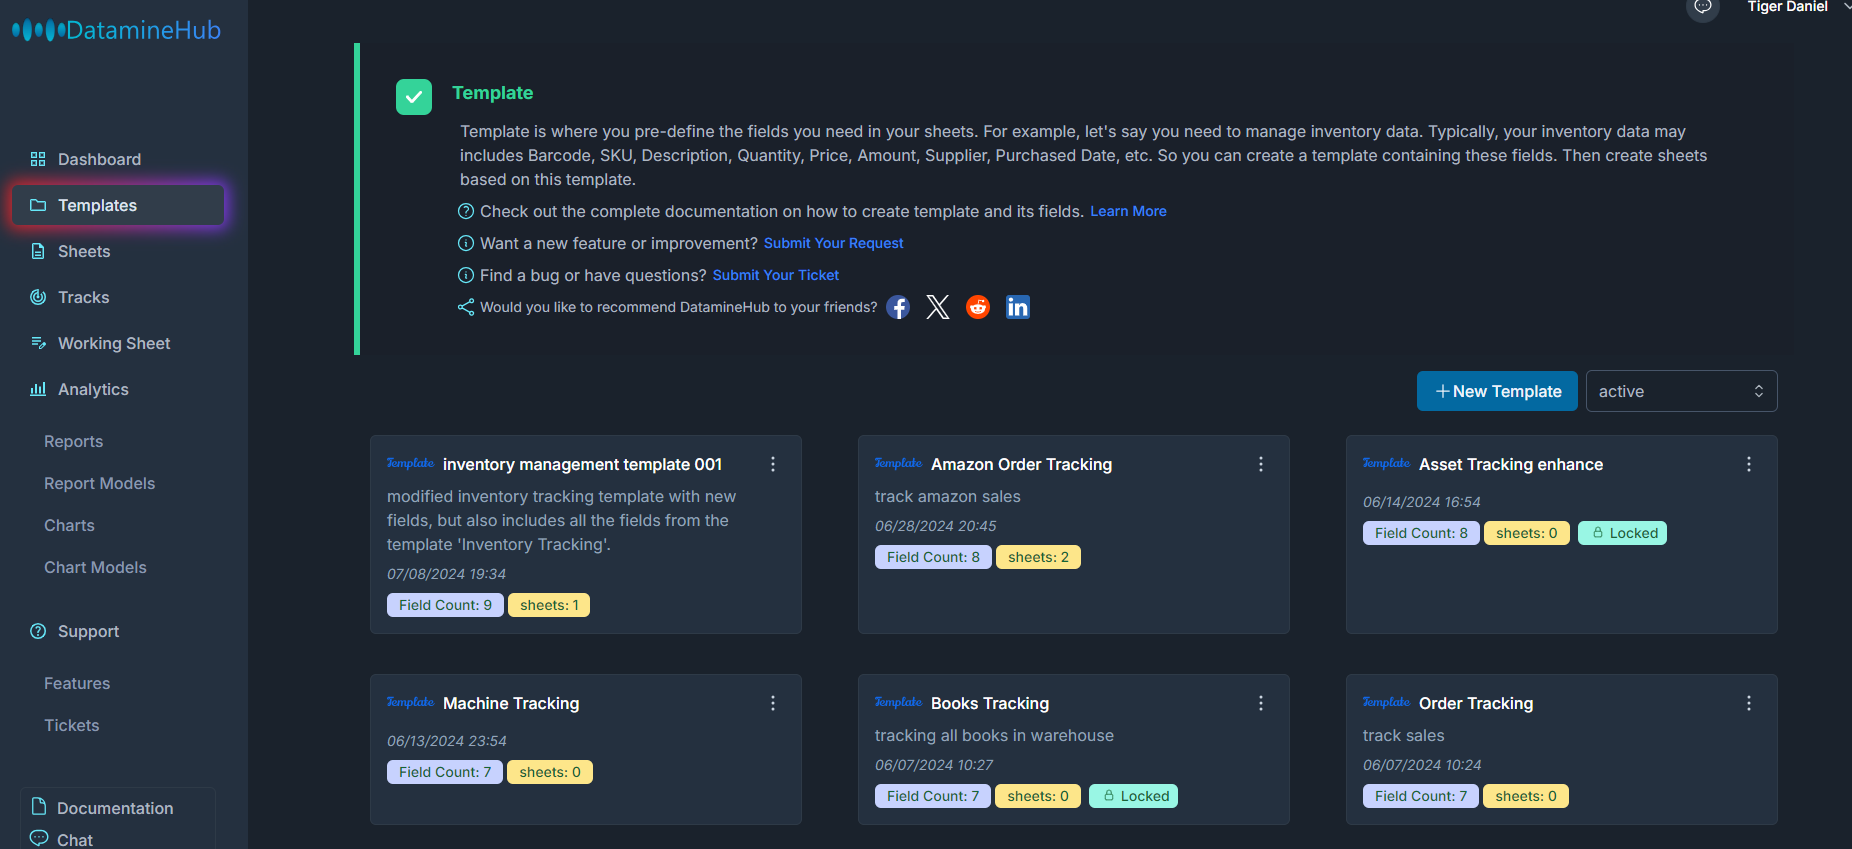
Field
Template allows us to classify data according to different industries. But in each template, we need to define the Name, SKU, UPC, Quantity, etc., which we call Field.
Let's say you created an inventory management template. In this template, you can add fields such as Name, SKU, UPC, Quantity, Supplier, Purchased Date, etc. You can also add formula type fields. For details, please refer to the Field document.
With the Template and its fields, when you add data to the file, you just provide the values of each field accordingly.
Field is available on both DatamineHub mobile and web app, below is an web app example to give you a more intuitive understanding of field.
[Double click the image to enlarge] 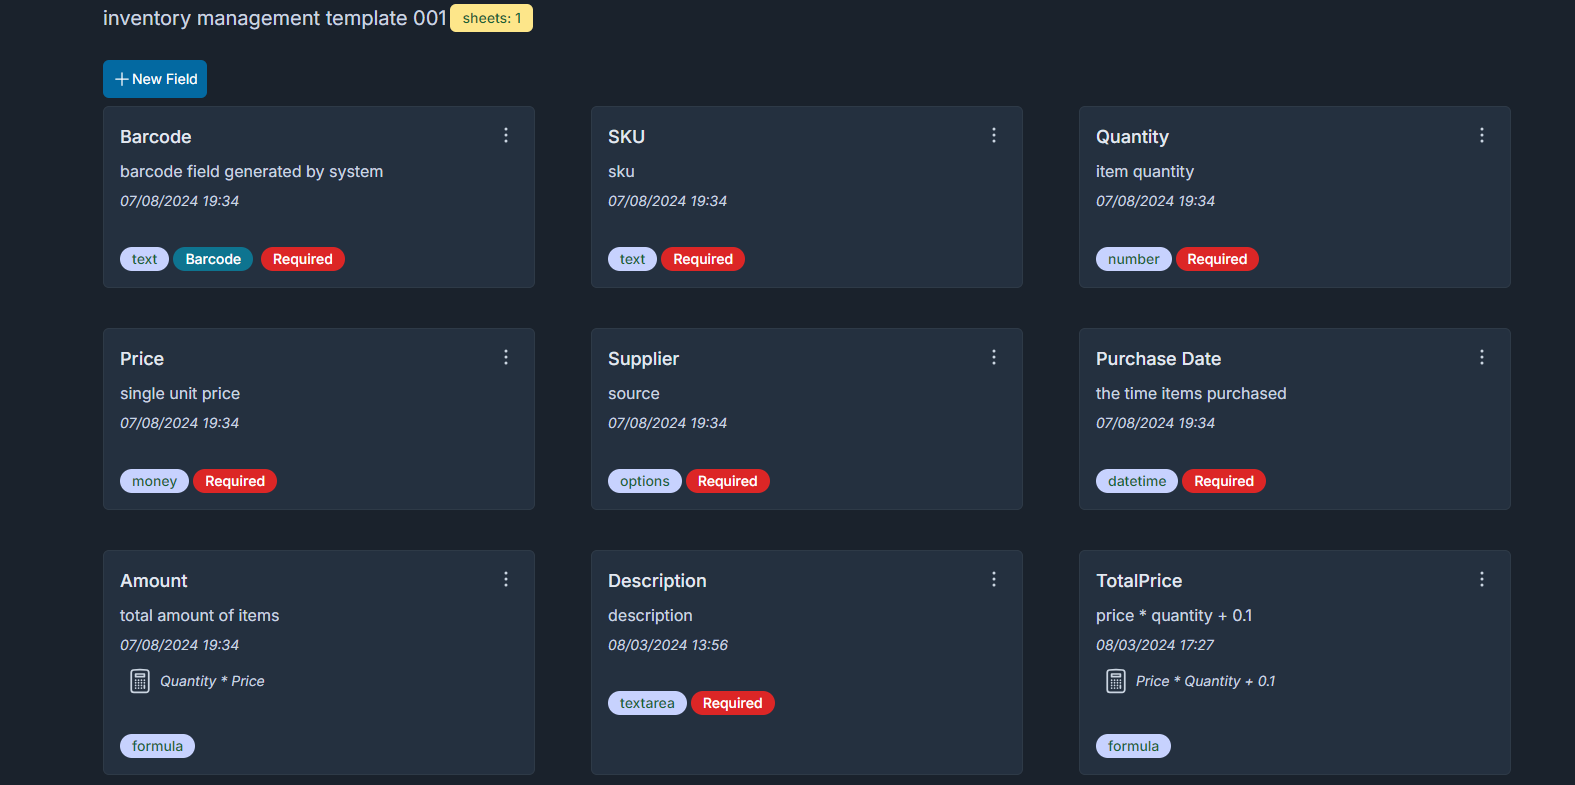
Sheet
A Sheet represents a data file. It is similar to an Excel spreadsheet. A sheet is where your data is stored. Once you create a sheet based on a template, you can add data to the sheet.
In DatamineHub, you have two ways to create sheets, which we call Template based and non template based.
Template Based Sheet
Let's say you create a template called inventory management template and its fields. Template Based sheet means that you then create a sheet based on inventory management template. Because all the fields are defined in the template, when you add items to this sheet, you just provide the actual values of these fields.
Below screenshot can help you understand it more clearly.
[Double click the image to enlarge] 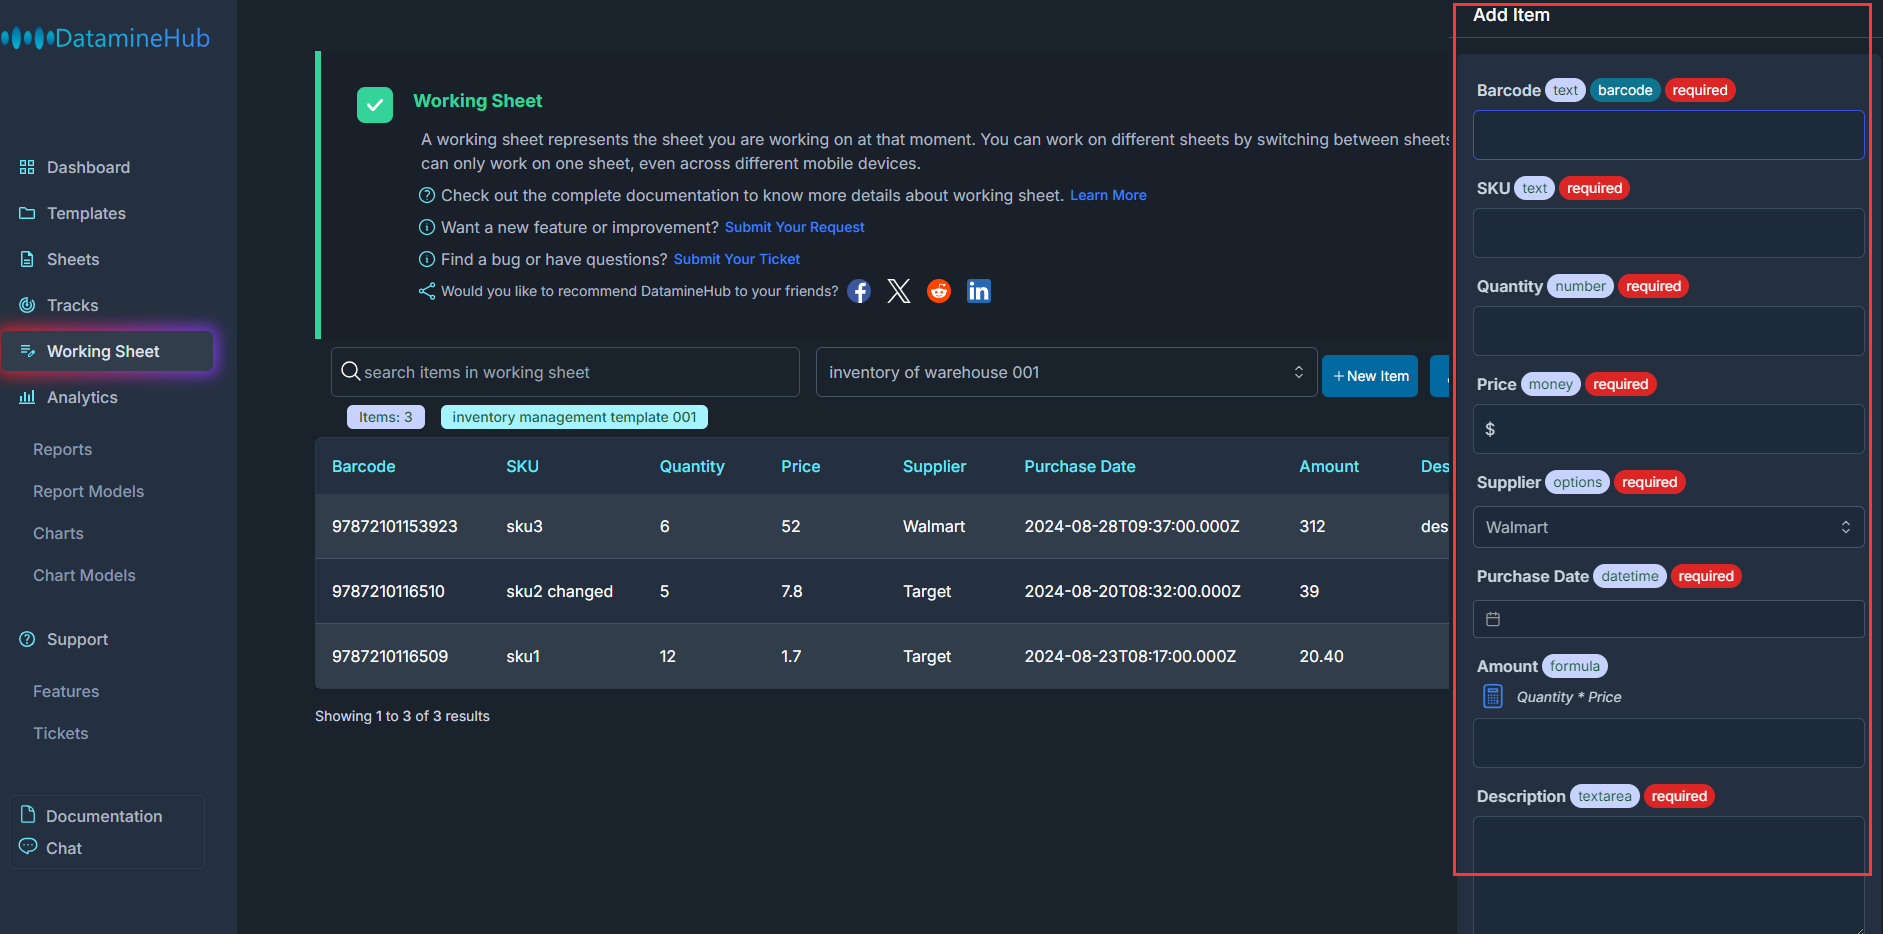
The Add Item modal lists all the fields defined in the template, what you need to do is to provide the value for each field.
Non-Template Based Sheet
Unlike template based, non template based means that you do not need to define the template and its fields in advance. You directly create a sheet and then add items to it. When you add the first item to the sheet, obviously, there are no fields defined in the sheet at this time. Suppose you need Name, UPC, SKU, Quantity fields. Then you can add a Name field in the Add Item window and enter its value. Then add a UPC field and enter its value, and so on. Until all the required fields are created and the values are provided, when you add the next item, you don't need to create these fields anymore.
[Double click the image to enlarge] 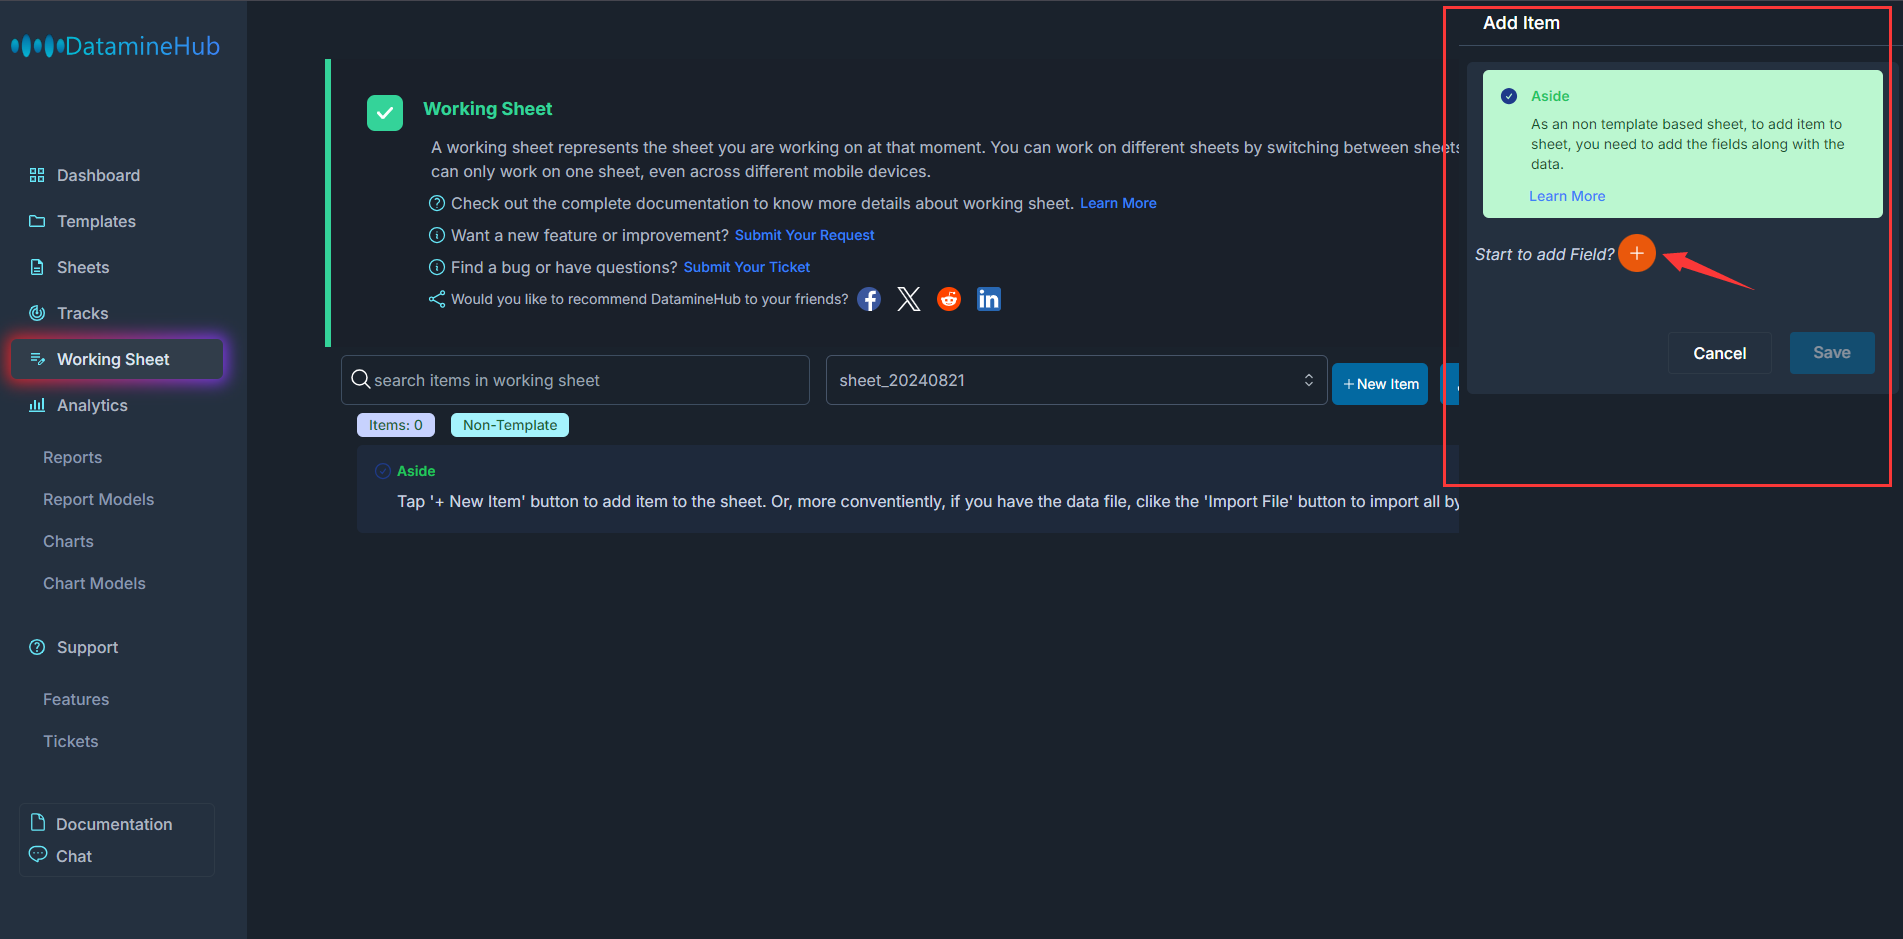
Working Sheet
You can create multiple sheets at the same time, whether template-based or non-template. But at any point in time, you can only add data to one sheet. This sheet is your working sheet.
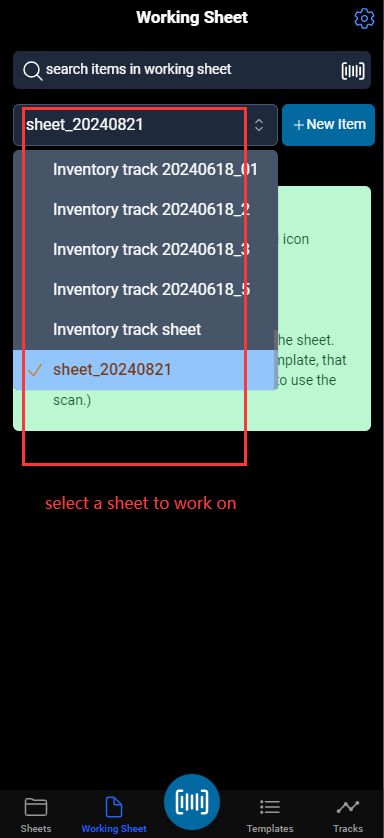
On the working sheet page, you can select the sheet you want to add data to, and then you can add data to it.
This feature exists in both the mobile app and the web app.
[Double click the image to enlarge] 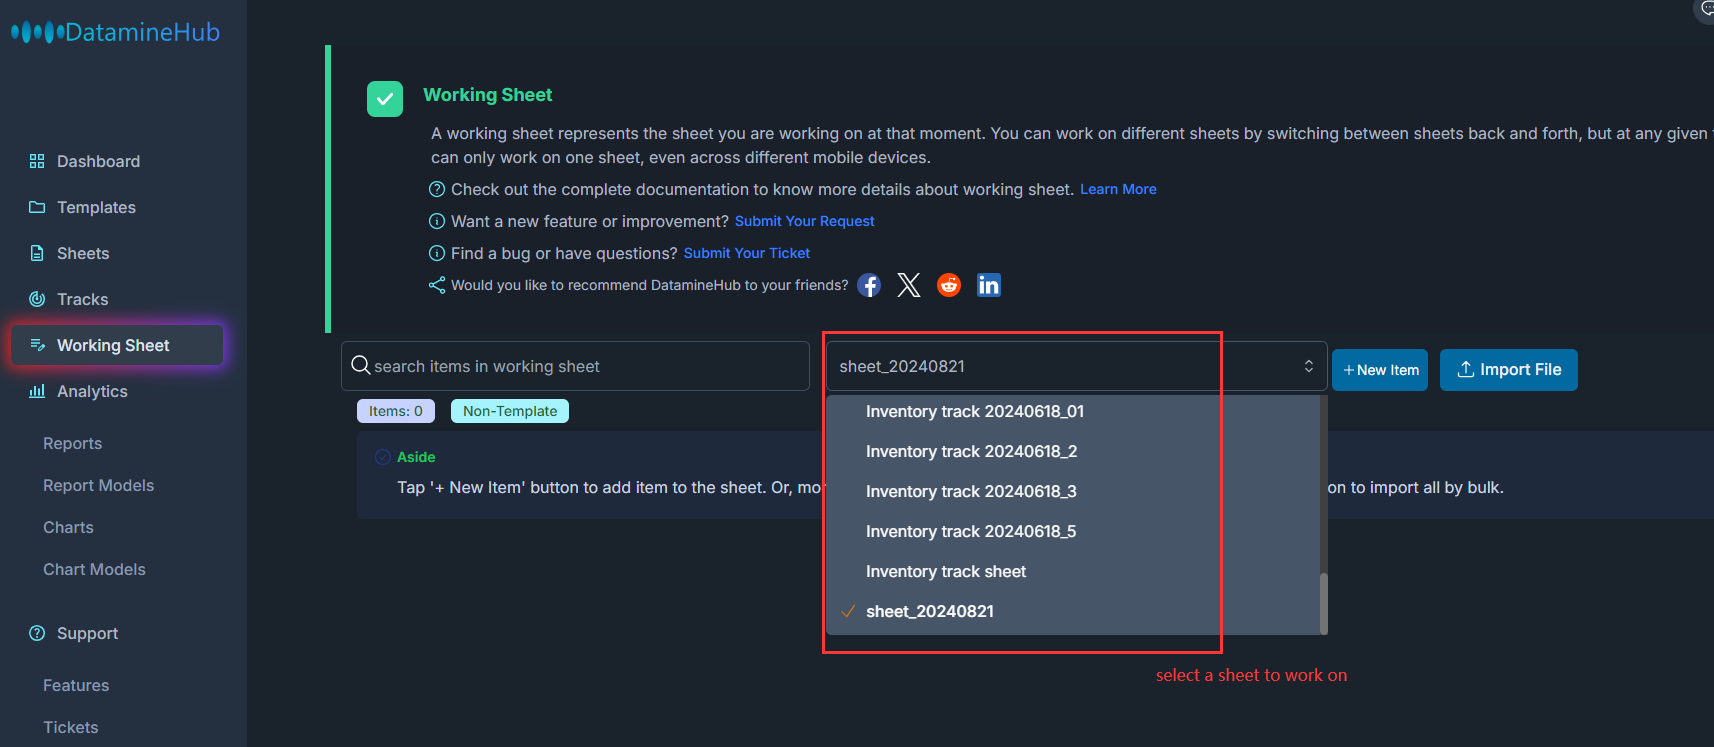
Or, what it looks like on DatamineHub mobile app:
Barcode Scanner
Barcode scanner here does not refer to hardware. Those hardware are usually handheld scanners, such as Honeywell Voyager.
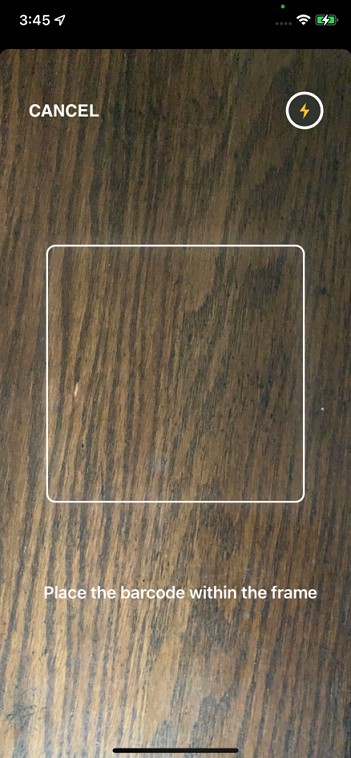
We are referring to the software solution included in our mobile app. Since smartphones have long been common, all mobile phones have built-in cameras. So if a mobile app can scan and extract barcodes, it is more convenient than a hardware scanner. The barcode scanner included in DatamineHub's mobile app is very powerful and can scan barcodes in milliseconds, even if the image facing the camera may be blurry or the angle is tricky.
Report
In addition to managing the data, do you want to be able to further analyze the data? For example, your sheet contains a lot of order data. You may want to know the products corresponding to these orders, their return on investment, and which suppliers have the highest profit margins. Then the report can be used to do it. Because you can completely define what data is included in the sheet, the report cannot be determined in advance. Through DatamineHub's flexible and easy-to-use report designer, you can define what your report should do.
Report is only available on DatamineHub web app. Check below example to get a closer understanding:
[Double click the image to enlarge] 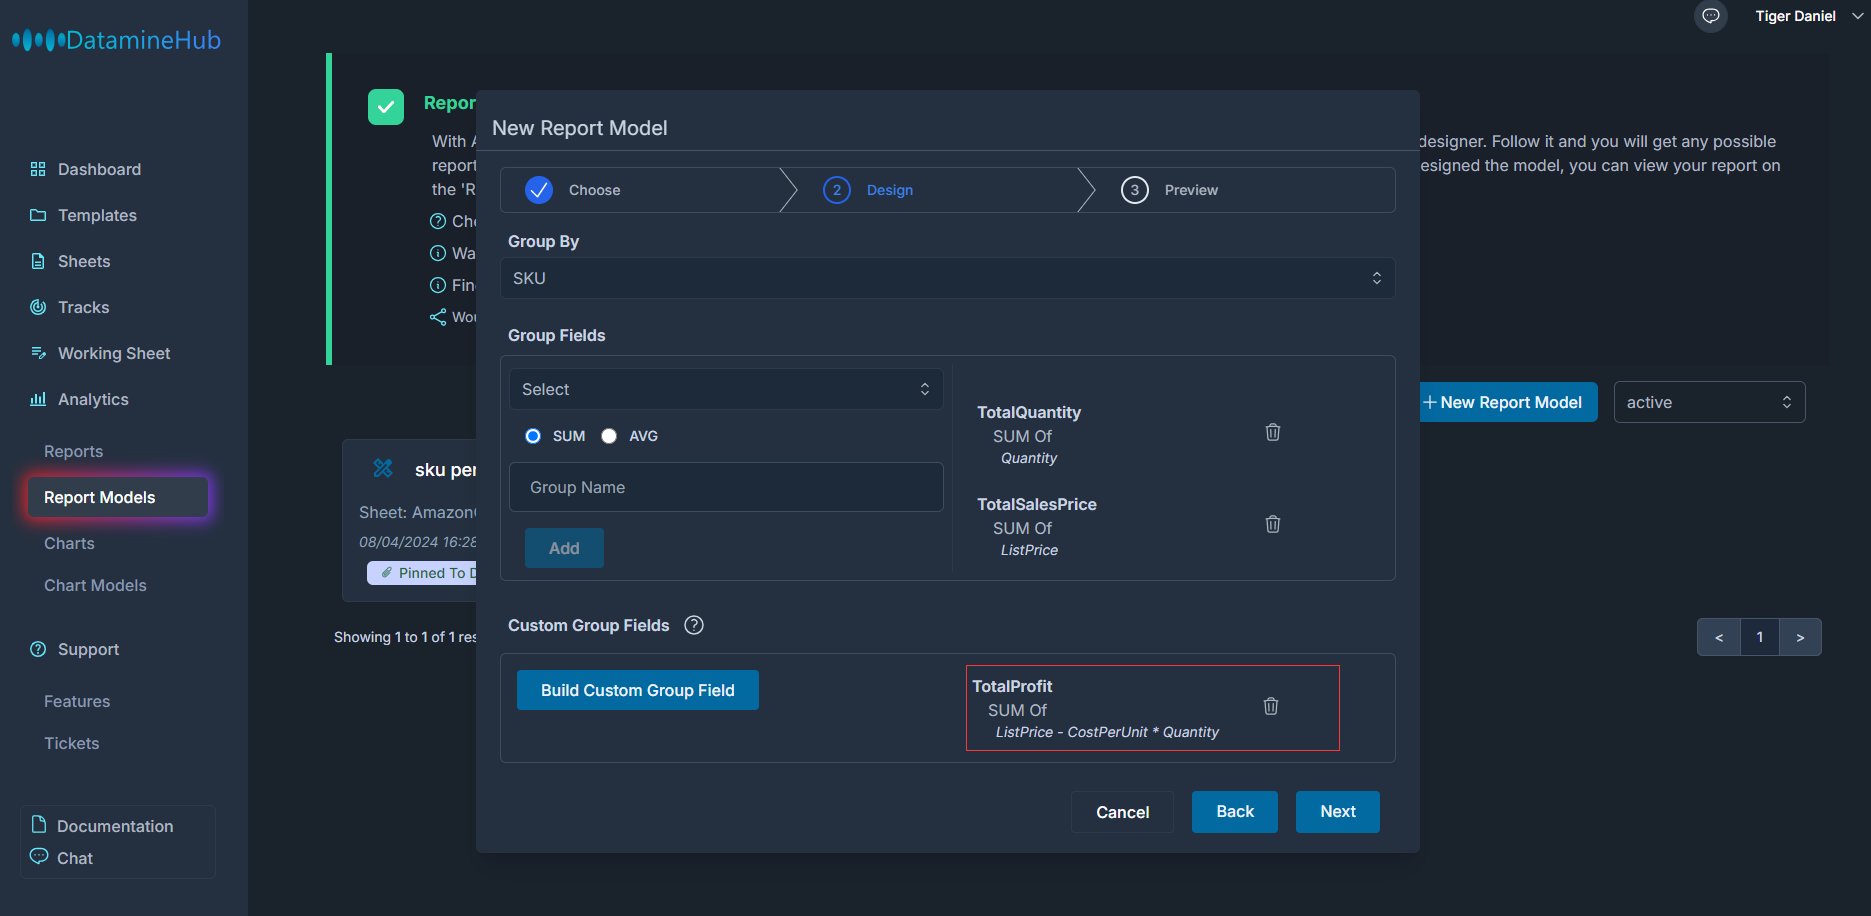
Chart
Charts are used to further visualize reports. Similar to reports, you can design the chart you want to visualize using the chart designer.
Chart is only available on DatamineHub web app. Check below example to get a closer understanding:
[Double click the image to enlarge] 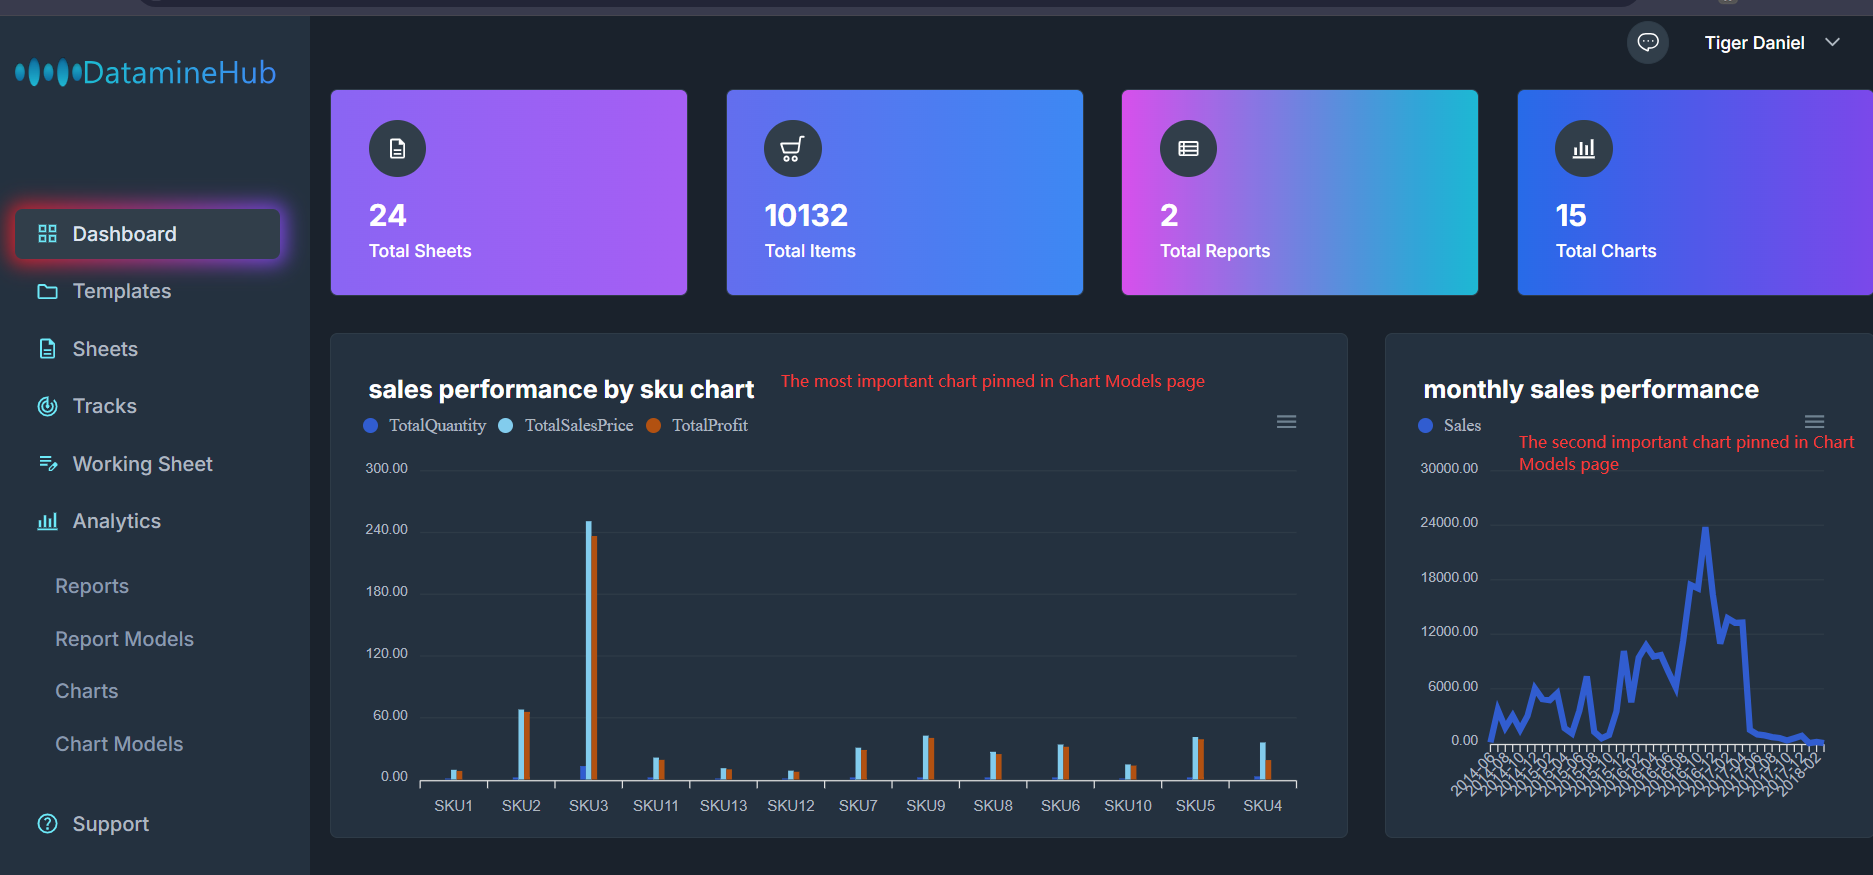
Track
In inventory management or other data management, we often encounter some of the most common and frequent operations. Check In and Check Out are typical examples. When a batch of goods enters your warehouse, you need to update the quantity of these goods. The operation method is to find each product in the sheet first, and then modify the quantity of the product. Although this is also very simple, it requires several steps. If there are many such operations, it seems a bit long-winded.
Track is used to optimize such operations. You can create a track for the sheet. In the track, define which field to check in or check out. For example, in inventory management, we can define a Check In track for the inventory management sheet. Specify that when scanning the UPC code, the quantity will automatically increase by one.
Track is available on both DatamineHub mobile app and web app. Check below example to get a closer understanding:
[Double click the image to enlarge] 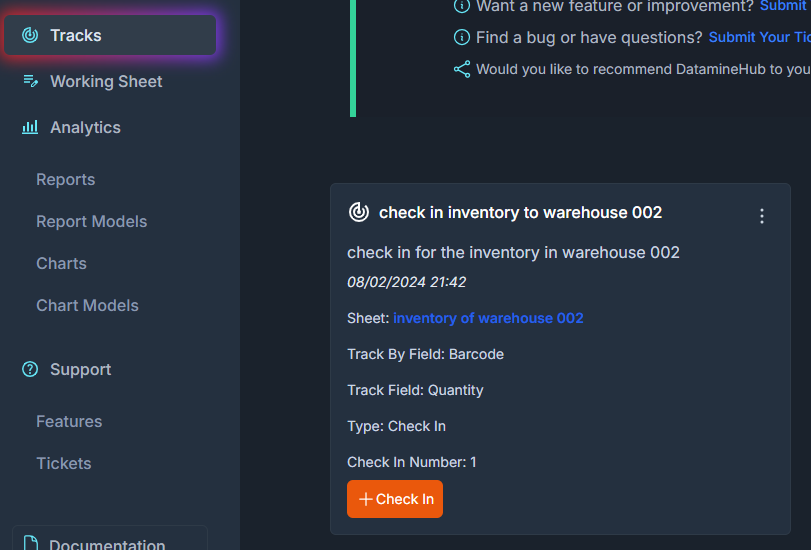
In this example, when you scan the UPC label of each product in your warehouse, the track will find the Barcode field, the value matches with the UPC label you scanned with DatamineHub mobile app, and increase the Field Quantity value by one.
